jQuery LavaLamp
Styling Tutorial
Getting Started with jQuery LavaLamp
Download the Libraries
Download jQuery, version 2.2.4, 1.12.4 or any version since 1.7 or use a Google API CDN link.
Download the jQuery Easing library version 1.4.1
Download jQuery LavaLamp release 1.4.1
Installing the Libraries
On my system, I placed all javascript libraries in a folder called /lib, right off of the website home directory. You can place them where ever you like, but be sure to change the example script src tags to match your file locations.
Let's start with a simple HTML document:
Next, let's add some simple CSS to style the list like a horizontal menu, and give the
backLava element some style, too. We will just paste this in the same document above, before the </body> tag.
Finally, we add the script code after that. This is how the LavaLamp is activated:
Now let's take a look at Example 1. It's working, but as you can see there is a problem - the floating backLava element is in the front, not the back where it belongs. Lets make a change to the CSS and try again:
Look at Example 2. We did it! We've successfully created a LavaLamp menu from scratch. Now we can go about styling the different elements to see how we can improve it.
Let's start by changing the background-color of the individual menu line-items:
Checking out Example 3 we now have another problem, since the normal line-items are no longer transparent, we can't see the hover any more. The only way around this is to put the text inside an HTML element like span, give the span some positioning and raise its z-index higher than the backLava element. We also need to give the backLava hover element a z-index higher than the regular menu line-items. Here's the new HTML adding the span tags:
And here's the new CSS:
Let's check out Example 4. That looks better and the CSS makes more sense, too. Typically we want the backLava hover element to slide between the line-item element and its content, and the best way to do that was to wrap the content in a separate container so we can give the content a z-index higher than the line-item container.
You should now have a basic idea of how to set up LavaLamp and some basic understanding of CSS positioning and z-index layers. Knowing your CSS well is required to produce advanced styles with jQuery LavaLamp.
Adding a background-image and CSS3 Styles
What we have so far is functional, but it isn't very stylish or modern. We can fix that for most browsers with a simple background image and a few extra lines of CSS. Here's the background-image we will be using to improve the look of the backLava hover element:

Now lets add it by changing the backLava CSS from our previous example:
Example 5 is looking better, but let's make some changes to the text and the borders using some new CSS3 tricks:
Example 6 looks better already, but there are still some problems. Let's adjust the padding on the line-item and turn off its background color and then fix the background color of the whole container (the ul element):
Example 7 looks a lot more professional and all we did was adjust font styles and color, add a background-image for the backLava hover element and employ some new CSS3 rules.
The three CSS3 rules we used were text-shadow to add the white glow around the text, box-shadow to add the drop shadow behind the backLava hover element and border-radius to add the curves on the backLava hover element. Since these rules are part of the not-yet-released-but-hotly-anticipated CSS3 Rules, Mozilla/Firefox and the Webkit group respectively added the -moz- and -webkit- prefixes to border-radius and box-shadow to distinguish their implementations in case the final CSS3 rule changes when it is released. Yes, it's confusing, but those are the breaks when developing on the bleeding edge of technology. To learn more about CSS3, see some demos and learn what browsers are currently supported, check out www.css3.info
Using and Styling Links in jQuery LavaLamp
Up until this point all the examples haven't been using a href link elements. We needed to first become familiar with the basic issues: z-index layers, positioning with margins and padding and simple styling with background-image, borders and CSS3 effects.
<a href > elements are treated as inline content and share the same properties as span elements. Changing our menu text to links is easy, just change the HTML:
And before we run into the same layer issue with the a element, let's be sure to add this CSS:
Example 8 looks okay, except that default link color is definitely not working. Let's fix that and add an a:hover with a different color than the plain link, and let's also give the link some more space, making the menu hover bigger:
Example 9 looks a lot better. The only thing that bugs me about the links is that we only get the a:hover effect if we are precisely over the text. If we stray outside the actual link text, the hover changes and nothing happens when you click, even though the LavaLamp hover is still there! This can obviously be confusing for website visitors. How can we make sure that the link is triggered whenever we are over the whole LavaLamp hover and not just the link text?
We can solve this by turning the a element into display:block. Now we can add top and bottom padding.. and move the padding from the li element to the a element:
Example 10 is what we are looking for - nice fat links that will work when we click them and also trigger the LavaLamp hover effect.
Automatic Default Start Location
Another feature of LavaLamp is it will attempt to match the current document URI with one of the a href tags in the menu. If LavaLamp finds a match it will start out and default to that menu item (unless you override it with one of jQuery LavaLamp's other settings.) Try it by clicking on Example 10 link with a hash reference and then refreshing the page. It defaults to the third menu item since it most accurately matches the URI in the browsers location bar.
Advanced Image Styling with jQuery LavaLamp
Unfortunately, almost half of all internet users are still browsing with Internet Explorer 6, 7 or 8. None of these versions of IE support any of the CSS3 techniques we've been using at all. If you are just sprucing up a simple design with some CSS3, how the design degrades for Internet Explorer may be okay with you and your visitors.
But if you want an image-styled LavaLamp that looks good on all browsers, you'll need to spend some time and effort designing a smooth background image that can be sliced into image pieces to assign to the special backLava sub-element div classes and then apply some extra CSS to bring it all together for seamless animation with real graphic images. This is called the sliding doors technique and that's what this lesson is all about, so let's dig right in.
Here is a snapshot of four separate background images I have cooked up for the original LavaLamp demo. You should be able to see their dimensions, filenames and the classes they are assigned to within the .backLava element, namely .backLava, .leftLava, .cornerLava and .bottomLava. For your own production you want to make sure the .leftLava element is large enough to fit the largest possible area that you will be applying the LavaLamp hover effect.
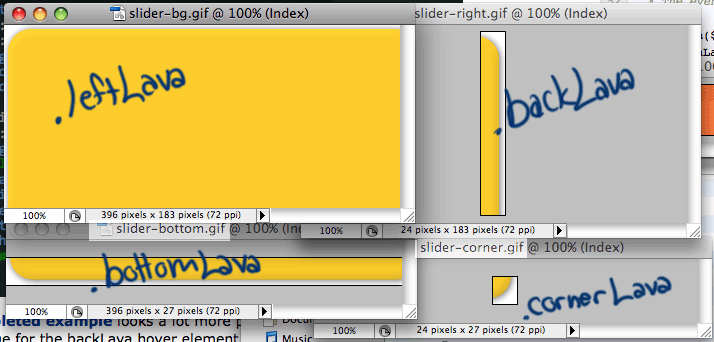
When jQuery LavaLamp is activated on a container, it automatically adds three additional div elements with the class names .leftLava, .cornerLava and .bottomLava.
We are going to go through the CSS needed one by one to make those image segments work as intended. First, the li.backLava needs to change:
the CSS segment above changes the primary backLava li element background-image to the right border of the slices and tells the browser to position it in the top right corner.
the CSS segment above assigns the largest portion of the image slices to the div.leftLava sub-element with an orientation of top left and ensures the height of the div is always 100% of the size of the container (which is the li.backLava element that is dynamically resized when moved.
the CSS segment above assigns the right corner image slice to the div.cornerLava sub-element, fixes the height and the width, sets the position to absolute and locks the div into place on the interior of the parent li.backLava element.
the CSS segment above assigns the wide bottom left image slice to the div.bottomLava element, fixes the height, sets the position to absolute so we can lock the div into place on the interior bottom of the parent li.backLava element. It also sets the width to 100% to ensure it will always fill as much width as possible when the parent backLava is resized upon moving.
Let's use the above CSS to modify and add to the CSS from the last previous lesson's example and see what happens. By assigning the special CSS noted above to each of these provided sub-elements and adding some extra top and bottom padding to the a element we will be able to achieve a bubbly, vertical and horizontal expanding and contracting hover element that that really looks like a lava lamp! With what I've provided above, you should get something similar to Example 11
Well it works like it should, but bottom/corner elements don't fit perfectly - I must have sliced them too close. This is the sort of thing to look out for and tweak accordingly before your final Lava Lamp is ready.
The only thing this lesson needs to complete and show off the full LavaLamp is some text of different heights to demonstrate how the backLava element can expand and contract accordingly, keeping the sub-elements where they need to be to look good. Let's change the HTML to this and try again:
Example 12 gives us a good, final example of the flexibility and styling features for jQuery LavaLamp. There are many possibilities, with some creative CSS layout, unique images and the correct easing fx, you can create a wholly individual menu animation for your website.
Check out the demos illustrating various features like the click function callback and the returnDelay setting.
Okay, that is all I have in me for tutorial mojo at this time. If you spot any typos or something really doesn't make sense - maybe I didn't connect enough dots!! please email me and let me know specifically what you found wrong. If you are still having problems getting it right, before you email me, here are some tips:
jQuery LavaLamp Tips
- Learn about CSS element positioning: A great place to start is w3Schools.com CSS Positioning. Also, be sure to peruse PositionIsEverything.net and QuirksMode.org for the nitty gritty on cross-browser compatibility and quirks.
- Use a debugging plugin: like FireBug for Firefox or if using Chrome or Safari/Webkit right-click on a page and choose 'Inspect Element' from the pop-up menu. This will help you see how you have set your margins and other CSS, allowing you to experiment in realtime until you get it right to put in your CSS files.
- Experiment: Try out small changes with the demo packages on your own until you get the hang of styling the various elements and experiment with different parent/target element arrangements.
What next? Check out the demos and experiment!
If you find a bug, have a feature request or better yet, a pull request, please submit an issue and let me know what you've found.